
With fun pet-themed fabric and a weaving design you pick, you'll have a charming stocking to match your pet's interesting psyche.
Read on for guidelines to make one for your pet!

**Fabric paste
**Scotch tape
**1/4 yard robust-colored fabric (for front; I utilized lightweight canvas)
**12" by 20" bit of stitched cotton fabric (for back)
**1/2 yard print cotton fabric (for inward coating)
**Medium weight cutaway stabilizer
**Temporary splash cement
**10" length of 1/4" wide lace (for peg)
**Air-eradicate pen
Extraordinary Project Notes:
Fulfilled Size: 10" wide by 18" towering
Designs Used:
I utilized the vast size of the Ring-a-ling Cat from the Feline Navidad Design Pack. The Santa's Claws Christmas Stack or the Happy Holidays Kitten might look sweetheart on stocking moreover.


Remove the design pieces and tape them as one unit by taking after the directions printed on the plan pieces.


Utilizing an air-delete pen or other checking instrument, jab a gap in the inside of the template and mark the fabric. Additionally, stamp the even and vertical pivot indicates.

Evacuate the template and draw lines joining the imprints; the lines could be utilized for hooping.


When the design has finalized, trim away the overabundance stabilizer on the posterior of the weaving.

Remove the shape.


Utilizing design piece 1, cut one bit of the print cotton fabric (for the back inward covering) and one bit of the stitched cotton fabric (for the back).

To make the strip peg, curtail a bit of 1/2" wide lace to 10" long. Carry the closures as one unit to form a circle and stick set up with fabric paste. Place the circle at the top focal point of the back internal covering fabric with about 1/4" of the circle expanding out past the edge of the fabric and bind set up.
Arrange the back piece (knitted cotton) on top, wrong side confronting up. Bind set up and sew a 1/2" crease along the external edges leaving a 3" to 4" opening along one of the sides for turning.

Cut the crease stipend along the bended edges concerning each 1/2".


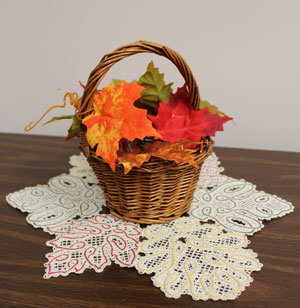
You can make a doily out of every one of the one ribbon leaf design, or intermingle and match the designs any manner you like. Both routines make a beautiful expansion to home ornamentation!
When you have sewed your ribbon leaves, continue perusing for guideline on the best way to make them into a doily.

**Cotton string (see note on picking string underneath)
**Water dissolvable stabilizer
*Paper towels
Exceptional Project Notes:
Battenburg ribbon needs the utilization of cotton string, a somewhat heavier weight than is ordinarily utilized as a part of machine weaving. The mostoften-utilized 40 weight rayon or polyester string should not work in Battenburg bind, as it won't hold up the fragile lines.
I've utilized Coats and Clark 30 and 35 weight cotton string. It's named as Mercerized ELS Cotton for Machine Quilting & Crafts; Machine Quilting; or All Purpose. I find Coats and Clark cotton string at JoAnn's. I've moreover utilized Madeira Cotona, which is a 30 weight cotton string.
I utilize the 30 -35 weight cotton string both in the bobbin (I wind my particular bobbins) and in the top (needle).
For a significantly more sensitive, and to a degree softer impact, you can utilize standard bobbin string within the bobbin (which is ordinarily 70 weight), and 30 -35 weight cotton string in the top/needle. Bobbin string, be that as it may, just goes in white and dark, so in the event that you decide to utilize consistent bobbin string for your trim, you'll be restricted to utilizing white or dark as a part of the needle (as to make the piece attractive from both sides).
A note about water-solvent stabilizers and needles:
There are a considerable number, numerous diverse marks of water-dissolvable stabilizer ready. Some are meager and light, some are sinewy, and some are thick and ample. It could be confounding to pick the right one for your trim activity.
We've digitized and sewed many unsupported trim designs, and have constantly great comes about with Sulky Ultra Solvy (the huge weight water-solvent stabilizer by Sulky) and Vilene, a stringy water-dissolvable stabilizer.
Use a sharp needle rather than a weaving needle) when weaving onto water-dissolvable stabilizer -particularly if utilizing the "plastic-looking" kind (for example Sulky Ultra Solvy). A weaving needle has a greater focus, which makes greater gaps in the water-dissolvable stabilizer, expediting tearing and misalignment.
Completed Doily Size (when every last trace of the same shape is utilized):
Battenburg Maple Leaf (Lace)
6x10 estimate: 14 3/8" in distance across
5x7 estimate: 12" in distance across
4x4 estimate: 7" in distance across
Battenburg Oak Leaf (Lace)
6x10 estimate: 16" in distance across
5x7 estimate: 13 1/4" in distance across
4x4 estimate: 7 5/8" in distance across
Battenburg Fig Leaf (Lace)
6x10 measure: 15" in width
5x7 measure: 12 1/2" in width
4x4 measure: 7 1/4" in width
Designs Used:
I utilized the medium sizes of the Battenburg Maple Leaf (Lace), the Battenburg Oak Leaf (Lace), and the Battenburg Fig Leaf (Lace). You might moreover simply utilize one of the leaf designs for each of the six clears out.


Wind a bobbin for every color of string you could be utilizing.


Take the trim in high temp water from the tap for around 10 to 15 minutes.


What's more your trim is lacking nothing!

Zigzag line the pieces as one where the trim pieces touch utilizing the same color string as a part of the bobbin and top string that you used to weave the designs.


What's more the ribbon doily is done right!

Line an entire heap of dexterous Battenburg trim leaves --as doilies or without help from anyone else, they are a marvelous fall adornment expansion!

The teapot shape makes this mug mat in particular enchanting. Include a weaving design you cherish, and it comes to be considerably more beautiful!
Read on for guidelines to make a sweet teapot mug carpet!

**10" wide by 10" heightened bit of fabric (for front; I utilized lightweight canvas)
**10" wide by 10" heightened bit of fabric (for back; I utilized print cotton)
**Small bits of fabric (for handle; I utilized cotton fabric)
**Medium weight cutaway stabilizer
**Temporary spread glue
**Air-delete pen
**Large catch (I utilized a 1 1/8" catch)
**Needle and string for some hand sewing
Designs Used:
I utilized the humble size of the Star Snowflake (Redwork) from the Happy Holidays (Redwork) Design Pack. You can add certain Christmas cheer to your teapot mug floor covering by sewing designs from the Peppermint Potpourri Design Pack, and like it lasting throughout the winter with Intricate Ice (Bluework) Snowflakes. Both great decisions!
Completed Size: 9" wide by 5 3/4" towering


Uproot the template and draw lines uniting the imprints.


Remove the shape.


Make a peaceful minute with a container of tea --or sweltering cocoa or cafe --all the more unique with a teapot mug carpet.
Make one for yourself, and one for an associate!

Made totally in the loop, blessing tags go in heaps of fun shapes with themes and assessments to fit each taste. Tie them onto your bundles and blessing packs, or the tree --they make incredible decorations, as well!
Read on for guidelines to make your particular in-the-circle blessing tags.

**Small bit of fabric (for front, I utilized quilter's cotton)
**Small bit of 100% cotton muslin fabric or quilter's cotton (for back)
**Tear-away stabilizer
**Medium weight cutaway stabilizer
**Spray cement
**1/8" wide lace
**Fabric marker or fine-focus pen
**Craft blade
Designs Used:
A 'Tis the Season Gift Tags (In-the-Hoop) Design Pack


Right away, with the blessing tag pieces cut and available, the time it now, chance to weave the tag. Band a bit of tear-away stabilizer.


Then, within components of the blessing tag will sew.


Put the band go into the machine, and keep sewing. An "E" fasten (or cover join) fringe will sew afterward.

Afterward, an eyelet will sew. This is where the strip can be included later.


Use a fabric marker or fine indicate pen to compose your welcome and you are finished!

Happy in-the-circle blessing tags make a fun expansion to occasion exhibits. Line one for every living soul on your record!
Popular Posts
-
 Sunny days are here, and so are huge-overflowed floppy hats. There's no better path to keep the sun off your front side and neck wh...
 -
 A weaved pincushion arranger continues sewing essentials in compass, and lights up any room's adornment. Fill it with all your for ...
 -
 Stitcher Kathy roused this task with her awesome wool pocket pillow, offered on www.Embrohow.blogspot.com Downy isn't just delicat...
 -
 Make perusing an exceptional book an all the more otherworldly experience with a sparkling lace and Mylar bookmark! The aforementioned ...
 -
 Smaller than expected-stitchs are a snappy --and spectacular --path to make home adornment for occasions and seasons! Two samples are ...
 -
 The in-the-circle Spool of Thread Alphabet is impeccable for making bunches of staggering tasks, from personalized pennants to cooler...
 -
 Towels are a staggering path to deck the corridors --and the kitchen and the eating room and the bathroom --for the occasions. They go i...
 -
 A weaved voyage pet bed is just the thing to make your canine (or feline!) feel at home, regardless of the possibility that you're o...
 -
 Upper room windows is an accepted bedcover design that is only ideal for making your particular --as contemporary or as universal as you...
 -
 Determine Santa knows your feline has been exceptional all year by sewing a delightful fish-molded Christmas stocking. Load with toys an...