The in-the-circle Spool of Thread Alphabet is impeccable for making bunches of staggering tasks, from personalized pennants to cooler magnets and nexus chains!
In this undertaking, Kenny takes you with the steps to line the delightfully cunning Spool of Thread Alphabet (In-the-Hoop) designs. Clear and strong letters inside a string spool can match any ornamentation with fabric colors of your decision.
Read onto study how to transform the aforementioned lovely letters into a standard, magnets, and a keychain. Amazing for the sewing room, and for the refrigerator! Beginning nexus chains might additionally make fun stocking stuffers.
Peruse on for directions to make some of your particular!
Supplies Needed:
**Small bits of fabric (for front and back; I utilized felt)
**Temporary splash cement
**Medium weight cutaway stabilizer
**Small bits of print cotton fabric (I utilized quilter's cotton)
**Medium weight cutaway stabilizer
**Tear-away stabilizer
**Masking tape
**Two 3" lengths of 1/8" wide to 1/4" wide lace (discretionary --for pennant clothes rods)
**Yarn or enriching line (discretionary --to hang standard)
**Self-glue attractive tape or bind magnet and craft glue (discretionary)
**Small grommet, grommet instrument, and keychain ring (discretionary)
Extraordinary Project Notes:
The aforementioned simple-to-sew Spool of Thread Alphabet designs are extremely flexible: make icebox magnets, nexus chains, and ornamental standards!
Designs Used:
I utilized the Spool of Thread Alphabet (In-the-Hoop).
When you download an in-the-loop spool of string design, you'll find three indexes. One record will start with the letter "X" accompanied by 4 numbers --that is the weaving document. The other indexes are checked with "_DL" --those are the dielines.
The dielines are utilized to cut the fabric for the front and back (the indexes are stamped as "_DLFront" and "_DLBack"). In the event that you have weaving programming, open the DL (dieline) documents and print them at full estimate.
The aforementioned are the templates we will utilize to cut the shapes. Depending on if you don't have weaving programming, you can sew the dielines straightforwardly onto paper. To do this, circle a bit of paper and weave the dieline records.
Afterward, shower a bit of medium weight cutaway stabilizer with transitory cement.
Smooth the fabric on top of the stabilizer.
Shower the rear of the paper template with a brisk shot of cement and smooth it on top of the fabric. Remove the shape. Do this for the front dieline, and the back dieline as well.
Depending on if you don't have weaving programming, an additional choice is to weave the dielines straightforwardly onto the fabric. Curtail a bit of medium weight cutaway stabilizer and fabric a spot greater than your circle. Splash the stabilizer with transitory glue, smooth the fabric on top, and loop the fabric and stabilizer as one. Join the circle to the machine, burden the first dieline document (the records that end in "_DL"). Weave the dieline.
Remove the shape.
Presently that the fabric pieces are cut and prepared to go, now is the right time to collect the spool. Loop a bit of tear-away stabilizer.
Load the full weaving design (the record that starts with "X" accompanied by 4 numbers). Connect the circle to the machine and weave the design. The leading thing to sew is an additional dieline. Any time you see a note on the color change sheet that states "front piece tack down" stop the machine.
At that point, spread the rear of the front fabric piece with glue.
Place the fabric piece right inside the sewn dieline.
Proceed with the design. The following thing to sew is a zigzag join. This tacks the fabric down to the stabilizer to hold it set up throughout the remnant of the weaving.
Different components of the design will sew afterward. Search for a note on the color change sheet that states "back piece tack down." When you get to this focus, stop the machine.
Uproot the loop from the machine yet don't unhoop the stabilizer. Shower the posterior of the back fabric piece with cement. Turn the band over to the posterior and place the back fabric piece right inside the shape.
I wound a bobbin with the same shade as the top string for the remaining steps.
Provided that you are making a pennant with the spools, you can add strip circles to the top to make hooks. Cut two 3" lengths of 1/8" wide to 1/4" wide lace and shape them into circles.
Tape them set up around one crawl in from every top corner of the top edge of the back fabric piece. The crude finishes may as well face in and grow onto the fabric about 3/4".
Shower the rear of the back fabric with cement and put it inside the shape on the rear of the weaving.
Likewise, tape the circles set up to the stabilizer to counteract them from being sewn over.
Join the circle back onto the machine and keep weaving the design. The following thing to sew is a tack down line which ties the back fabric to the stabilizer. Furthermore at last, a glossy silk fasten fringe will sew.
Evacuate the stabilizer from the circle and delicately tear the abundance away. To hang your standard, basically string yarn or enriching string with the circles at the top of the spools, tie circles at every finish of the yarn, hang it like a pro, and get a charge out of!
An additional choice is to make cooler magnets by including self-cement magnet tape or catch magnets to the rear of the spools. To include catch magnets, include a couple drops of heated glue and press the magnets set up.
Hang your magnets on the cooler and you are finished!
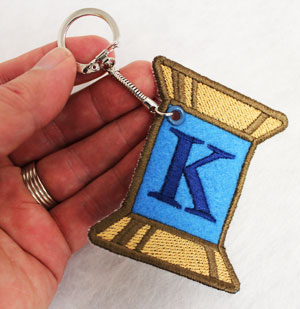
Make a keychain by adding a humble grommet to one of the upper corners on the fabric simply above the letter. At that point include the keychain ring and away you go!
Personalized flags, magnets, and crux chains made with the in-the-band Spool of Thread Alphabet are a breathtaking path to brighten for an unique event, and to give exceptional blessings to family and associates.