A weaved voyage pet bed is just the thing to make your canine (or feline!) feel at home, regardless of the possibility that you're on the way. With straps that snap for simple conveying and space, and two open pockets for stowing most beloved toys and treats, this select pet bed is best in show!
An agreeable bed is this incredible treat for your pooch, and with excellent weaving, it can be a jazzy expansion to any room.
Read on for directions to make one of your particular!
Supplies Needed proceeded:
**3 yards predisposition tape maxi funneling
**7" measurement ring or plastic top (for following)
**Heavy calling snaps and snap device
**Need and string for some hand sewing
Supplies Needed:
**1 1/2 impressive packs of polyester fiberfill (24 oz. sacks)
**1 yard durable fabric (for front and back of bed; I utilized bull denim)
**1/2 yard print fabric (for side pockets; I utilized lightweight canvas)
**Medium weight cutaway stabilizer
**Temporary shower glue
**Air-delete pen
**2 3/4 yards 1" strap
Exceptional Project Notes:
Finalized Size: I made the medium size bed (29" wide by 29" heightened). It would be ideal if you point to the qualified information underneath depending on if you might want to make a modest or great estimate bed. Use this qualified data for cutting the pieces and accompany the orderly directions for the development of the bed:
Substantial Size -40" wide by 40" elevated
Front and Back Panels -41" wide by 41" towering
Pocket Pieces -21" wide by 28" towering
Straps -One at 70" long and one at 71" long
Little Size -18" wide and 18" elevated
Front and Back Panels -19" wide by 19" towering
Pocket Pieces -9 1/4" wide by 12 1/2" towering
Straps -One at 30" long and one at 31" long
Designs Used:
I utilized the little size of the Woof Bone, extensive size of the Simple Swirls Corner 2 design, the medium Inky Dog, and the expansive Inky Dog Corner . Any designs from the I Love My Dog II Design Pack or the Puppy Love II Design Pack might look doggone extraordinary on the pet bed besides.
To start with, to arrange the fabric for the top of the bed, curtail a bit of solid fabric (I utilized bull denim) to 30" wide by 30" towering. Utilizing a 7" distance across ring or plastic top, put it in every corner arranging the edges with the external edges of the fabric, follow the shape, and cut along the followed lines.
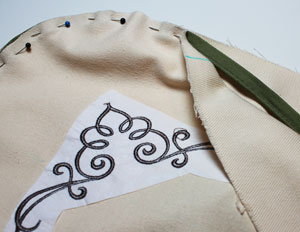
Make paper templates of the designs by printing them at full estimate utilizing weaving programming. Organize the templates on the fabric where you need them. I put the templates in every corner with around 3" of space between the external edges of the designs and the edges of the fabric. Utilizing an air-delete pen or other stamping device, jab an opening in the focal point of the template and mark the fabric. Moreover, mark the level and vertical hub indicates.
Uproot the templates and draw lines interfacing the shapes.
Splash a bit of medium weight cutaway stabilizer with transitory glue and smooth the fabric on top. Band the fabric for the first design by hooping the fabric and stabilizer as one unit by straightening the imprints on the band with the lines on the fabric.
Connect the band to the machine and load the first design. Move the band with the goal that the needle is straight over the core purpose of the band and weave the design. When the design has fulfilled, unhoop the fabric and trim distant the abundance stabilizer on the rear of the weaving. Rehash the hooping and weaving process for every of the designs.
To get ready the fabric for the side pockets, reduce a bit of fabric (I utilized lightweight canvas) to 15" wide by 20" elevated. Make paper templates and put them along the short finishes of the fabric with the top edges of the designs challenging the short finishes (as indicated).
I positioned my templates with 1 1/2" of space between the top edges of the designs and the short finishes of the fabric. Additionally, focus the templates side to side by measuring equivalent separations between the side edges of the templates and the side edges of the fabric.
Mark the fabric as you did previous, uproot the templates, and draw lines associating the imprints. Circle the fabric and weave the designs all in all as you did previous.
Afterward, lay the weaved pocket piece on top of the fabric, right sides as one, bind set up, and remove the shape. Sew a 1/2" seam along the short closures just. Turn the fabric right side out, press the seams with an iron and after that best fasten a 1/4" seam along the overlaid short closes just.
To arrange the base of the bed, lay the weaved beat piece on top of the fabric (right sides as one unit) bind set up, and remove the shape. Uproot the top piece and lay the lowest part piece even with the right side confronting up. Lay the pocket piece on upper, right side challenging up. Focus the pocket piece inside the bottom piece by measuring equivalent separations on every side.
Pin the pocket piece set up and measure and mark the inside of every long side by measuring and isolating by two. Draw a line joining the imprints. Sew a seam along the line you just drew; this seam connects the pocket to the bottom fabric and divides the two pockets. At that point, sew a 1/8" seam along every of the long sides to tack the pocket piece set up.
To include the straps, cut one bit of 1" wide strap to 50" long and a second piece to 51" long. Pin the 50" long strap set up by adjusting the crude finishes with the core seam on the pocket piece; focus the strap over the crude long sides of the pocket piece (the strap will circle up and over the top of the pocket). Bind set up.
At that point, include the 51" strap to the inverse side of the pocket piece by first folding over every crude closure 1/2" and arranging them with the core seam of the pocket piece. Cover the crude finishes of the first strap about 1/2"; focus the strap over the crude long sides of the pocket piece as you did previous and bind set up. Sew a seam along the side of the straps, beginning and ceasing at the top edges of the pockets.
Tuck the straps inside the pockets and bind them set up so they should not be sewn over later on. Adjust the top and lowest part bed pieces as one unit, right sides as one unit, embed the funneling in the middle of the layers with the even edge adjusted with the crude edges of the top and bottom fabric. Bind set up and sew a seam as near the funneling as could be allowed (I utilized a zipper foot on the machine to draw near to the channeling) leaving in regards to 6" open for turning.
Turn the bed right side out. At that point, stuff the bed with polyester fiberfill until it is rounded out however still delicate enough for the bed to be overlapped down the middle.
Hand-sew the opening shut.
Fold the bed down the middle and adjust the straps as one at the top. Hold the straps as one simply above the bed (tight enough to hold the bed set up, yet not so tight that the straps should not be held set up with snaps). Mark the straps on both sides right now (I stamped mine around 16" up from the core seam on the pockets).
Open up the bed and lay the straps level. Include the catch bit of the snap to one favor the gap of the snap challenging up.
Add the remaining piece to the inverse strap with the handle of the snap challenging up. Fold the bed fifty-fifty, straighten the straps, snap them set up, and you are available to go!
Notwithstanding your most beloved pooch could be agreeable as could be, with a bed equipped to voyage whenever you do. Fill the pockets with most beloved toys, toss it in the back of the auto, and hit the street! Additionally put it in your pet's most beloved corner at home for an alluring and cushy spot to rest. Join one for your most beloved pet today!