You can make a doily out of every one of the one ribbon leaf design, or intermingle and match the designs any manner you like. Both routines make a beautiful expansion to home ornamentation!
When you have sewed your ribbon leaves, continue perusing for guideline on the best way to make them into a doily.

**Cotton string (see note on picking string underneath)
**Water dissolvable stabilizer
*Paper towels
Exceptional Project Notes:
Battenburg ribbon needs the utilization of cotton string, a somewhat heavier weight than is ordinarily utilized as a part of machine weaving. The mostoften-utilized 40 weight rayon or polyester string should not work in Battenburg bind, as it won't hold up the fragile lines.
I've utilized Coats and Clark 30 and 35 weight cotton string. It's named as Mercerized ELS Cotton for Machine Quilting & Crafts; Machine Quilting; or All Purpose. I find Coats and Clark cotton string at JoAnn's. I've moreover utilized Madeira Cotona, which is a 30 weight cotton string.
I utilize the 30 -35 weight cotton string both in the bobbin (I wind my particular bobbins) and in the top (needle).
For a significantly more sensitive, and to a degree softer impact, you can utilize standard bobbin string within the bobbin (which is ordinarily 70 weight), and 30 -35 weight cotton string in the top/needle. Bobbin string, be that as it may, just goes in white and dark, so in the event that you decide to utilize consistent bobbin string for your trim, you'll be restricted to utilizing white or dark as a part of the needle (as to make the piece attractive from both sides).
A note about water-solvent stabilizers and needles:
There are a considerable number, numerous diverse marks of water-dissolvable stabilizer ready. Some are meager and light, some are sinewy, and some are thick and ample. It could be confounding to pick the right one for your trim activity.
We've digitized and sewed many unsupported trim designs, and have constantly great comes about with Sulky Ultra Solvy (the huge weight water-solvent stabilizer by Sulky) and Vilene, a stringy water-dissolvable stabilizer.
Use a sharp needle rather than a weaving needle) when weaving onto water-dissolvable stabilizer -particularly if utilizing the "plastic-looking" kind (for example Sulky Ultra Solvy). A weaving needle has a greater focus, which makes greater gaps in the water-dissolvable stabilizer, expediting tearing and misalignment.
Completed Doily Size (when every last trace of the same shape is utilized):
Battenburg Maple Leaf (Lace)
6x10 estimate: 14 3/8" in distance across
5x7 estimate: 12" in distance across
4x4 estimate: 7" in distance across
Battenburg Oak Leaf (Lace)
6x10 estimate: 16" in distance across
5x7 estimate: 13 1/4" in distance across
4x4 estimate: 7 5/8" in distance across
Battenburg Fig Leaf (Lace)
6x10 measure: 15" in width
5x7 measure: 12 1/2" in width
4x4 measure: 7 1/4" in width
Designs Used:
I utilized the medium sizes of the Battenburg Maple Leaf (Lace), the Battenburg Oak Leaf (Lace), and the Battenburg Fig Leaf (Lace). You might moreover simply utilize one of the leaf designs for each of the six clears out.


Wind a bobbin for every color of string you could be utilizing.


Take the trim in high temp water from the tap for around 10 to 15 minutes.


What's more your trim is lacking nothing!

Zigzag line the pieces as one where the trim pieces touch utilizing the same color string as a part of the bobbin and top string that you used to weave the designs.


What's more the ribbon doily is done right!

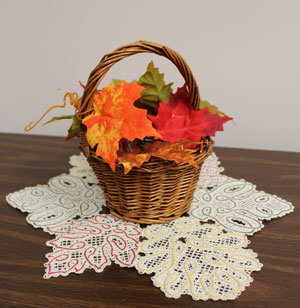
Line an entire heap of dexterous Battenburg trim leaves --as doilies or without help from anyone else, they are a marvelous fall adornment expansion!