
Sunny days are here, and so are huge-overflowed floppy hats. There's no better path to keep the sun off your front side and neck while outside. Besides obviously, they must be weaved.
Be that as it may what sort of designs work best? What sort of stabilizer, may as well a fixing be utilized, and how in the planet does one loop a monstrous' overflowed hat? I acquired a few hats and tried more than twelve distinctive design and stabilizer blends to find how to get best outcomes.
Here's the heap of my test hats (you can see we had a mess of fun sewing on the aforementioned!):
Finding and picking hats:
I discovered straw hats at Target, Lowe's, Wet Seal, and Michaels. I additionally recognized a mixed bag at Amazon.com. Of the hats that I recognized, they fell into two classes: One is a common strand straw hat; the other is an engineered sort of straw hat made of paper or a paper-polyester mix.
A portion of the engineered straw hats that I discovered at Lowe's and Amazon had an adaptable center circling the overflow. That center is utilized to chisel and shape the edge of the hat. In the event that you're working with a hat such as that, be cognizant that the needle can't infiltrate the center, so stay far from that zone while sewing.
The engineered straw hats arrive in a wide mixture of shades, and they're less costly than the common filament straw hats. Manufactured straw hats are made of polyester-covered paper; this structure looks like straw, yet feels heavier and a touch stiffer than regular filaments.
The method for weaving on both straw and engineered straw is the same, and is indicated underneath:

I printed a template of the design so I might figure out the situation. Where you put the design is substantially up to your private inclination. I put the design so the inside focus was halfway between the edge of the overflow and the crown of the hat.
The imprints indicated left are the design's focus, and flat and vertical hub lines.
Situation of designs is dependent upon you -line it where it looks the best to you!
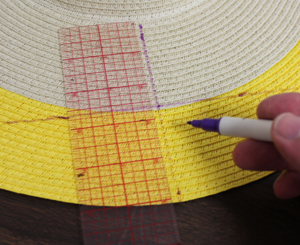
Use chalk, cleanser, or an air-delete pen to stamp the core of the design, and level and vertical hub lines.

Be that as it may, for the reason that I utilized a light and basic Redwork design, and on the grounds that the manufactured straw is exceptionally solid, I was equitably sure that tear-off stabilizer might do well -and to be sure, that created be correct.
In the visualization to the left, I've decreased a bit of tear-distant stabilizer and have drawn even and vertical hub lines on it. This will help me when lining up the needle in the following steps.
Hats can't be hooped, so make stamps on your tear-distant or water-solvent stabilizer to support in situation.

Initially I would have been wise to pick the loop. One of the fundamental standards and guidelines in weaving is to utilize the most modest circle that can suit the span of the design. Anyhow I'm straying from that administer with this venture.
Use impermanent spread glue to append the hat to the stabilizer.
I considered that utilizing a greater loop gave me more surface zone on the tear-afar stabilizer, which permitted me to lay the hat compliment. You will feasible discover the same. Assuming that you have a mixed bag of circles to browse, pick a huge one.
I hooped the stabilizer, straightening the imprints on the band with the imprints on the stabilizer. At that point, I spread the stabilizer with a brisk shot of provisional cement (I utilize Gunold's KK100). I arranged the imprints on the hat with the imprints on the stabilizer, with the external edge of the hat positioned nearby the right side of the band (the side inverse to the tab on the loop). At that point, I pressed the hat into spot.

I joined the circle to the machine and pressed the crown of the hat internal with the goal that the loop might have sufficient room to move, and the crown wouldn't look over opposite any machine parts.
I moved the loop for the purpose that the needle was right over the inside focus, then after that I sewed the design.
Curve the crown of the hat for the purpose that it doesn't knock opposite the machine while sewing.

Tear-afar or water-solvent stabilizer are both exceptional support decisions for straw and manufactured straw hats.

The furrowed fabric creates the fastens to dance and jag somewhat. You'll see it quit for the day, at the same time not from a separation.

This picture was taken from a little less than 3 feet distant, and the ruggedness of the running lines isn't discernible whatsoever. The Redwork design is an unpretentious and understated expansion to the hat.
From even a slight separation, the dance and jag of the fastens traverse the edges is not perceptible.
I was inquisitive to see if a fixing might minimize that spikes to the running fastens -however it doesn't. I sewed the Redwork design onto the hat with a water-dissolvable fixing, and afterward without. The outcomes were the same. The main contrast was the additional 30 minutes it took me to uproot the garnish, and the mess that I made while doing it. Depending on if you choose to line a Redwork design onto a hat, skirt the fixing. It doesn't have an effect.

When sewing designs with silk fastens or robust fills, use water-solvent stabilizer as a garnish.

You can wind a bobbin with the same string as you're utilizing as a part of the top to abstain from seeing bobbin string on the underside of the hat's overflow.
On the grounds that the aforementioned trendy hats have huge and floppy overflows, the rear of the design will indicate. Depending on if you wish, you can wind a bobbin with the same string that you're utilizing within the top. That way the underside of the overflow won't demonstrate the white bobbin sewing that you see in the above photograph.
Remember that manufactured straw hats are economically made, and the colors in the polyester-paper mix are liable to drain when wet. Any time utilizing a water-solvent stabilizer --if its a fixing or a sponsorship or both --don't drench the hat to uproot the stabilizer. Rather, tear the same of it afar as you can (utilize a tweezers or tip of scissors for the little zones), then afterward smudge the rest off with a clammy Q-tip or paper towel.

I utilized the same procedure with either water-solvent stabilizer or tear-distant stabilizer on the back, and the outcomes were awesome.
Think about the color of the hat when deciding on designs. Assuming that the hat is a strong straw shade, designs of any intricacy will appear well.

This hat has a heavier weave, and you'll note that the multi-colored straw makes a variegated impact.
While the strategy of utilizing water-solvent stabilizer as a support is the same, pick the designs painstakingly. You can see that this running fasten Redwork design becomes mixed up in the variegated straw.
Depending on if working with multi-hued straw, bringing about a variegated impact, Redwork designs should not indicate up great.

When working with variegated straw, pick designs with fills or glossy silk join. The aforementioned designs appear much superior to Redwork designs.
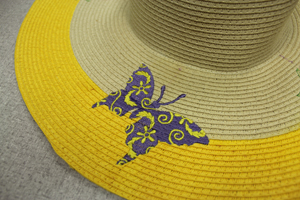
The Floral Butterfly design (humble size) is a two-color design with a plain fill and filigree expansion on top. I sewed it on the manufactured straw hat with water-dissolvable stabilizer on the top and the lowest part.
I was kept tabs on that roughness that appeared in the running join Redwork design. From this separation there doesn't seem, by all accounts, to be any division as the fastens cross the furrowed hat overflow. At the same time examine the photograph below.....
Designs with fills work great on the furrowed straw.
In this end-up photograph you can see how the fill fastens spread separated a tad as they go over the edges in the hat. This will happen regardless of if you're utilizing a design that has running join, fill join, or silk fastens. Besides, it will happen regardless of matter what sort of stabilizer you utilize on the back, and what sort of garnish you utilize on the top. This partition that you see is a consequence of the material science of sewing opposite a furrowed region.
A water-dissolvable stabilizer utilized as a fixing minimizes the partitioning demonstrated beneath, yet it doesn't kill it actually. What's more, as you can see from the photograph above, that partitioning is unnoticeable from even a short separation.


The aforementioned designs are light and breezy and are an amazing decision for huge-weave hats, as there are just a couple basic join that sew straight onto the hat. Demonstrated left is the Cozy Country Crafty Cut Flower Applique design (minor estimate).
Crafty cut applique designs are bright augmentations to straw hats.

There's no crown, so I didn't have to level it. At the same time I did tape vertical overflow down to level it more. This is a nonobligatory step.
Straw visors are additionally enjoyable to line onto, furthermore the strategy is the same.

To add embellishments to territories that can't fit under a needle, line the design onto organza.

Trim around the weaving and evacuate the water-solvent stabilizer.

I utilized a generally useful changeless glue (Elmer's Craft Bond Multi-Purpose Spray) and splashed it on the back of the weaving.
When dry, use changeless glue to fasten the organza to the hat.

Press solidly set up.

Utilizing this technique is an extraordinary way of adding weaving to parts of the hat -like the crown -where its demanding (if not difficult!) to get under the needle.
Use fabric paste to tack down detached edges.
