Fabric postcards are an extraordinary path to send warm wishes lasting through the year!
Decide on your most beloved shades, fabrics, and postcard designs to send a remarkable and personalized blessing to associates and relatives.
Rad beneath for the aforementioned unhindered undertaking guidelines.
Supplies Needed:
**Small bits of fabric (we utilized art felt and quilter's cotton)
**Small bit of white or cream hued quilter's cotton (for
back)
**Temporary shower glue
**Cutaway stabilizer
**Tear-off stabilizer
**Fabric marker or lasting marker
**Ribbon and grommets to hang postcards (discretionary)
Designs utilized:
An In-the-Hoop Christmas Postcards Design Pack
Fulfilled Size:
4 crawls wide by 6 crawls tall
less than 1/8 crawl thick
Weight -1/2 ounce (with envelope and stamp)
Mailing Instructions:
The emulating mailing guidelines were composed on September 1, 2009 and accompany the United States Postal Service mailing gauges. For state-of-the-art mailing qualified information, click here.
We prescribe utilizing a 4 3/4 crawl by 6 1/2 creep (A6) welcome measure envelope (we recognized our own at Target) with a First Class (right now $0.45) stamp to mail the postcards. This will secure the postcard and guarantee that it makes it to its beneficiary safe and sound. With a specific end goal to utilize a First Class U.S. postage stamp, the thing must weigh less than 1 ounce (our own weighs 1/2 ounce with envelope and postage).
You can additionally send the postcard as-may be, admitting that it might get harmed via the post office. The aforementioned fabric postcards measure 4 crawls by 6 crawls and might be sent utilizing one self-cement First Class (right now $0.45) stamp. Fabric postcards ought to be made 1/8 inch thick or less thick to stay inside weight constrains; cards over 1/4 creep thick will need an additional postage expense for their profundity and will weigh more. The U.S. Postal Service needs you to compose "postcard" on the back. Besides, if you've utilized fabric support, you need to make certain to do your written work with a pen that is both perpetual and fabric-safe. Again, make certain to utilize a self-cement stamp and don't iron set up.

When you download an in-the-hoop postcard design, you will see four documents. One is named with just a "X" accompanied by four numbers -this is the weaving document. The other records are dieline indexes and hold "_DL" in the name. The front piece is named "_DLFront" and the back piece as "_DLBack". The dielines for the front character pieces (challenges and caps for instance) are named with just "_DL". In the event that you have weaving programming, print the dieline documents at full estimate.
Provided that you don't have weaving programming, you can sew the dielines straight onto the fabric. Reduce a bit of cutaway stabilizer and fabric a touch greater than your hoop. Spread the stabilizer with cement and smooth the fabric on top.
Hoop the fabric and stabilizer as one.
Append the hoop to the machine and load one of the dieline documents. Weave the dieline straightforwardly onto the fabric.
At that point, remove the shape.
Do this for the front piece, back piece, and front character pieces.
Alternately, provided that you do have weaving programming:
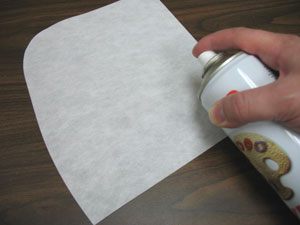
Spread a bit of cutaway stabilizer with cement...
...besides smooth the fabric on top. Splash the back of the paper templates with an extremely little product of glue, smooth it on top of the fabric, and remove the shape.
Do this for the front piece, back piece, and front character pieces. We are utilizing a light shaded quilter's cotton on the back so we can compose a memo on the postcard when it is finished.
A third alternative for slicing the fabric pieces is to sew the dielines straight onto paper. Hoop a bit of paper, weave the dieline straightforwardly onto the paper, and remove the shapes as depicted prior. Notwithstanding that the fabric pieces are cut and equipped, the time it now, chance to weave the postcard!
Hoop a bit of tear-distant stabilizer.
Append the hoop to the machine and load the weaving index (the document that is named with just a "X" accompanied by 4 numbers). Weave the design -the first thing that sews is an additional dieline. After the dieline has sewn, stop the machine.
Spray the posterior of the front fabric piece with glue.
Lay the fabric right inside the shape and proceed with the design. A tack down join (cover or "E" line) will sew afterward. This ties the fabric piece to the stabilizer for the leftover of the design.
Proceed with the design -the front character pieces will sew afterward. After the first character piece dieline sews ("cap dieline" for instance) stop the machine and splash the posterior of the fabric piece with glue.
At that point, lay the fabric piece right inside the dieline shape and proceed with the design. An additional tack down line will sew afterward.
Other character pieces will sew. After every dieline sews, stop the machine, splash the comparing fabric piece with glue, include the fabric piece, and proceed with the design. Different components will sew simultaneously, for example stars or swirls.
Search for a note on the color change sheet that states "back piece tack down." When you achieve this step, stop the machine. Evacuate the hoop from the machine yet don't evacuate the stabilizer from the hoop. Shower the rear of the back fabric piece with cement and include it inside the shape the posterior of the weaving.
Since both sides of the weaving could be perceived, we are winding a bobbin in the same shade as the top string for the remaining step.
Join the hoop to the machine and proceed with the design. A different tack down join will sew afterward -this ties the front and back fabric as one.
Unhoop and delicately tear afar the stabilizer. We discovered that it serves to overlap the stabilizer at the edges of the postcard first before tearing it off -this aides to debilitate the filaments and makes a clean tear.
Your postcard is currently finish! You might compose a memo on the back of the postcard utilizing a fabric marker or an indelible marker.
Depending on if you are mailing your postcards, we suggest utilizing a 4 3/4 crawl by 6 1/2 creep welcome-measure envelope. This will ensure the postcard and guarantee that it makes it to its beneficiary safe and sound.
You can additionally utilize the postcards as designs! Include a couple of grommets at the top corners, string strip with every opening, and tie a tie at every finish of the lace. Right away you can hang the postcard on the tree, on the divider, or add it to your Merry Mailbox!
Goodness what fun it is to see a thought, and bring about a significant improvement! Embroiderer Debb kept in touch with, "I utilized a meager cotton batting under the bear and cap. It looks amazing! Made the card generally 3-D looking...and it was no diverse to sew. I utilized a scrap of warm and characteristic batting. Anyway I suspect you might utilize any slim cotton batting that you may have scraps of.